Mad About Scrabble!

I am a lover of all things scrabble related! I guess that’s my inner geek coming through! So when I saw a picture of these adorable scrabble tile coasters on Pinterest! But I couldn’t find any tutorials of how to make them so I just made it up as I went along! For this week’s craft you will need wooden scrabble letters (you can buy these in packs on eBay for pretty cheap), thin cork coasters (again I got mine off of Amazon for not a lot), a glue gun, varnish and scissors.3

I’m a bit of a geek and keep all my letters in alphabetical order! First of all you need to start arranging 4 or 5 letter words that go together and match them into 4×4 or 5×5 blocks.4

Once you have your letters arranged, start to stick them onto the cork coaster using your glue gun. After the first row is in place, be sure to also glue the edge of each tile so that they all stay stuck together!1.1

Once finished, use some scissors to cut the coaster down to size.

2

To finish the coaster off, add a coat of varnish, like the one below. Make sure you follow the instructions on the canister you’re using and make sure you’re in a well ventilated room!5

Now all that’s left is to have your friends over and have a good old coffee and a chin wag!

6

All my love,7

God Bless,

Mims

xXx


Finding That Happy Place

One of the reasons I started this blog was to give me an outlet to help deal with the general stresses of life and work. I find a calmness and peace in crafting and creating, and since I’ve started this blog I really have noticed a difference in my ability to handle stress and deal with it outside of work. This week has been a little on the stressful side of life and so I thought I’d share with you one of my most favourite stress relievers. It’s a very simple craft and doesn’t take much explaining, but there is just something about it that brings an immediate sense of calm. Maybe it’s the focus on the mixing of the colours, and the patterns they create.

Untitled

For this you will need some paint brushes, some water to rinse them in, water colour paper so that the water doesn’t turn the paper soggy, and some ink (You can use water colour paints instead but they don’t have quite the same effect). I used Winsor & Newton Inks as they are readily available in WHSmiths.

6

Firstly decide on what you want to make or what word you’d like to create, for this I used the word ‘Love’. Then using clean water only, use the paint brush to draw the first letter. Using a finer paint brush, start adding droplets of ink over the water on the page and watch the colours spread out along the water line. Keep adding the ink, in different colours depending on your desired look, until the letter is fully formed. Then repeat the process for the rest of the letters and before leaving the page to dry.

7

8

10

It really is that simple! But the effect creates beautiful gift cards, bookmarks, wall pictures and anything else you can think of! And if you’re anything like me once you start you won’t be able to stop!

5

3

All my love,4

God Bless,

Mims

xXx

A Time to Travel

As some of you know we were fortunate enough to spend May travelling in the Philippines. We visited four Islands, Cebu, Bohol, Negros and Palawan, including 12 other islands off of Palawan. We had the most amazing time. As a nurse I have had the pleasure of working with many fabulous Filipino colleagues and am honoured to call many my friends. From my experience they are a very gracious, humble and generous community and it was truly incredible to learn more about their culture and explore their home.
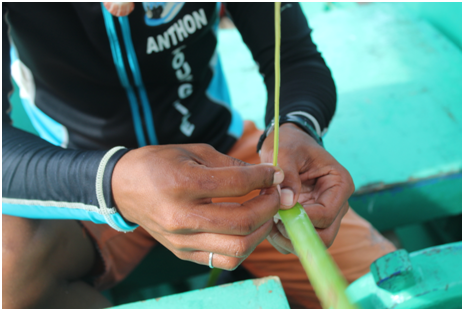
1

This is Anthon.

2

We spent 2 days sailing around the most beautiful islands and beaches I have ever seen with Anthon as our guide. He casually showed us how to make some amazing animals out of palm tree leaves! After a couple of minutes of weaving and folding the leaves these animals, birds, fish, turtles, even a grass hopper, just evolved and appeared. We loved how simple and natural they are.

3

He very patiently sat and let me photograph each stage of how to make an adorably cute angel fish! And I have been having a think as to what I could use to replicate the palm tree leaves now that I‘m home. I tried paper and card but they just didn’t have the same effect as they were too rigid. Then I tried ribbon and you can see below how to create these lovable little fish!

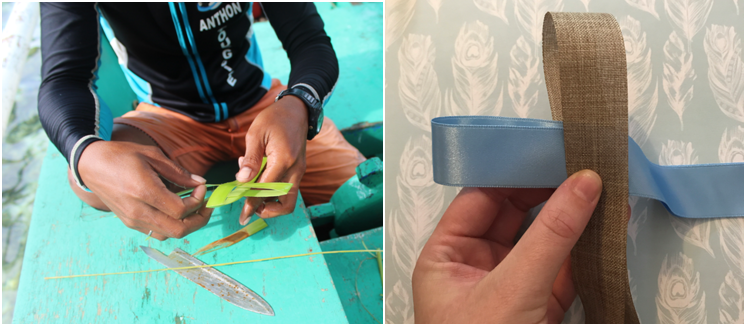
First up find some lovely ribbons, around 50cm long, with a width of 1.5-2.5cm depending on how big you want the final angel fish to be.

1

If you’re making them out of a palm tree leaf, then separate the 2 sides of the leaf from the stalk. You can do this by running your finger nail along the stalk.

2.1

Once you have cut your ribbon fold it in half and slide one loop inside the other.

2.2

Then take the bottom piece of the vertical ribbon and feed it through the horizontal loop.

3

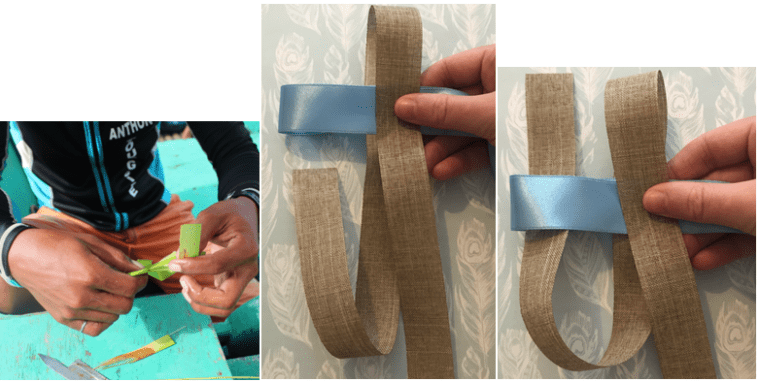
Bring the bottom piece of the horizontal ribbon through the vertical loop.

4

Then pull the 4 ends of the ribbons so the weave is pulled tight.

5

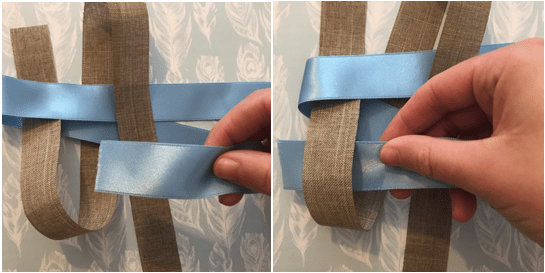
Turn the square over, and overlap the vertical ends of the ribbon as shown below.

6

Then bring the horizontal ribbon over and then under the vertical ribbon, first from the right hand side and then repeating this from the left.

7

Once you have done this, again turn the square over. Loop the right hand side ribbon over and under the already woven ribbon. Then bring the top ribbon down and weave it through.

8

You should now have something that looks like this… hopefully! Use some fabric scissors to form the fins.

9.1

If you’re making this out of leaf, then very carefully using a knife, cut a small piece off of the middle stalk of the leaf. Pierce a small hole in the leaf and poke the stalk through to create an eye. Then cut a curved piece of leaf and cut a small hole in the side of the fish and feed it through to create a little side fin.

10

If you’re using a ribbon with a pattern on only one side, using a glue gun, glue half of the ribbon and fold the end over and tuck it into the end of the woven centre of the fish. Once dry then cut diagonally to create the fins.

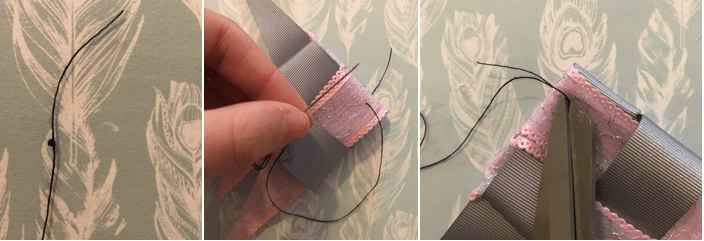
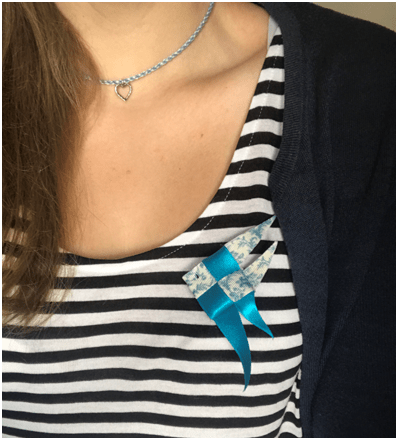
To make an eye in the ribbon fish, get some black thread and tie several knots on top of each other. Then using a needle, pass the thread through the fish and then fasten it by tying another knot and cutting the remaining thread off. You can then make the fish into anything you’d like!! For example, a broach, a decoration or even a hanging mobile for a nursery.

11

12

14

13

All my love,16

God Bless,

Mims

xXx

Summer Scatter Cushions

During my recent travels to the Philippines I was fortunate enough to be taken to some amazing fabric shops and I might have been a little naughty and purchased a fair amount!! They were amazing, floor to ceiling filled with hundreds of different colours, patterns and textures. I couldn’t quite believe my eyes. (Please excuse the goofy picture!!)

2

1

Whilst I was eeking at all the fabric, my travel buddies, Jordan, Jess and Emmil patiently browsed with me! Jess and Jordan even picked out some adorably cute fabrics and I made them into lovely cushions. Here’s how to make them!

Firstly select your chosen material like thee lovely summery patterns.

3

Once chosen, lay your material out face down, and look at the dimensions of your cushion inner. I brought mine for £1.75 each from Wilkinson’s. These were 18×18 inches.

4

Then using a measuring tape, measure your material to the dimensions of the cushion inner. Making sure you have enough material overlapping on one side to form the opening of the back of the cushion cover.

6

Pin down the closed side of the material to keep the shape of the material. Sorry about the dodgy pics btw!

7

To create the opening at the back of the cushion you’ll need to create a neat seam along the two overlapping ends of the material.

I folded approx. 1cm of the edge of the material over twice and sewed down this to make a neat edge to the opening of the back of the cushion.

I then pinned down the two remaining open sides of the cushion cover before sewing the edges together. Once down it’s time to turn the cushion cover the right way round before inserting the cushion inner.

8

9

These are a really simple, easy make but have the potential to change up your deco in minutes and the cushion inners are easily re-used! Just find some more fabric you love and repeat the process for a fresh new look whenever you fancy a change!

11

12

All my love,

God Bless,

Mims

xXx

Bubbly Bath Bombs

I don’t know about you, but I love trying new things and this week I had a little fun experimenting! A friend of mine sent me this link a little while ago, and suggested I try and make these bath bombs for the blog.5

https://www.youtube.com/watch?v=sPqp1hDsM6I

I tried a few recipes that created lovely soaps but I couldn’t get them to fizz, including the link above. But I finally found one to work. The link below is a really simple recipe that creates really cute effective bath bombs!! I have commented below on how I got on using it and a few changes I made from combining other tutorials. I hope you enjoy!

https://www.thesoapkitchen.co.uk/acatalog/Recipe-Bath-Bomb.html

It was a slightly messy process so I wore gloves. So to begin with I poured 150g of bicarbonate of soda in one bowl and the same into a second bowl. I then mixed 50g of citric acid into each bowl and mixed the contents well. For the colour, I used gel food colouring which worked really well, adding a little at a time until I got an even colour spread. I used some vanilla essential oil (10mls as suggested by TheSoapKitchen, 5mls in each bowl) to add a lovely fragrance.

Then add a tiny bit of water at a time, until the mixture starts to feel firmer and form some shape.

U3

I then used silicone cake cases as a mould, gradually putting some of each mixture into each case, before firmly patting the mixture down. Next up is to let the mixture dry. That is completely dry as if you get over excited like me and remove the cases too quickly, you leave part of the mixture still in the case!

Then the fun really begins and you can watch your bath bombs come to life!!

10


5

All my love,

God Bless,

Mims

xXx

S is for Summer

This week has been a little dull and gloomy and rainy!!  Summer is just around the corner and yet so far we have only been teased with a few lovely warm days. So this week I decided I needed to do some bright and summery crafting!

I was having a sneaky stroll around Hobbycraft the other day (always a little dangerous for my bank account!) and came across some lovely wooden box letters. I instantly felt compelled to fill them with little tissue paper pompom flowers.

2

First up I selected my colour scheme in tissue paper before cutting out multiple different sized circular shapes. I made sure there were at least 6 layers to each circle of tissue paper. I then stapled the centre of each pile of circles. To make different styles of flowers, I cut varying shapes around the edges, for example spiky edges.

4

3

Then carefully, I peeled up each layer of tissue paper and scrunched each piece up in the centre of the flower.

5

Using a print stick I stuck the flowers down inside the box letter having arranged them all to work out a pattern/make sure they all fitted in.

6

And then all that’s left to do is find a home for your lovely summery decoration!

8

I hope you all have a lovely weekend,

9

All my love,

God Bless,


Mims

xXx


7

Hello June!

So this week I have had major post holiday blues! We had an absolutely incredible time in the Philippines, and I will be doing a post all about it in a couple of weeks. But in the mean time, I’m trying to fill my room with pretty flowers to keep me happy! And I love finding new and cute ways to display them. This week’s crafting follows on from last week’s theme of light bulbs. Here is how to make these lush hanging light bulb vases.

9

First up is to dismantle your light bulb. This can be messy and potentially dangerous as your dealing with small shards of glass. I recommend putting the light bulb in a box to collect all the shards, and wearing goggles and washing up gloves to protect your eyes and hands.

2

  1. I used a pair of side cutters to remove the initial pin.
  2. Then using some pliers I gradually started to break the black glass. This is quite thick glass, and make sure you hold the metal top of the light bulb not the glass dome as it’s easy to accidentally squeeze too hard and to break the dome glass.
  3. Next up you need to remove the glass that holds the filament in place. This again is quite thick. I used a screwdriver placing it on the thick glass and gently taping the end with a hammer. You have to be gentle but firm but watch out that when you free the filament, it doesn’t fall too quickly as it can smash the dome below! Remove enough of the glass so you have a smooth edge inside.
  4. Then finally using your pliers gently remove the remaining filament and then you have your empty light bulb.

4

As you can see it’s a little messy!

To make the holes, I carefully used a screwdriver to push through the metal part of the light bulb. I made a grove initially with the tip of the screwdriver, so it didn’t slip on the rounded surface. Again watch out for your eyes and hands as you pierce the metal.

5

To make the hanging part I used some thin florists wire and threaded beads onto it at varying intervals. I twisted the wire around the beads so that they stay in place.

6

I then fed the wire through the holes and twisted it in on itself to secure. To add a little more decoration, I wrapped a thin piece of ribbon around the beaded wire and secured it to the back of the light bulb with my glue gun. To hide then bottom of the metal part of the light bulb, I used another thin piece of ribbon and secured it to the back of the bulb with my glue gun.

7

8

And there you have it, such a cute little way to display some happy little flowers!

All my love,9

God Bless,

Mims

xXx

10

11

That Light Bulb Moment!

According to a sneaky little Google search, 2,500,000,000 light bulbs are sold each year. 20,000 of which are on the Eiffel tower alone! The average life of a light bulb is around 2000 hours (83 days). But what if there was a way to extend their lives even longer and recycle them!

Here is a little (slightly messy) tutorial on how to make this lovely light bulb vase. This was another spy on Pinterest that took me quite a while to work out how to make!!

3

First up is to dismantle your light bulb. This can be messy and potentially dangerous as your dealing with small shards of glass. I recommend putting the light bulb in a box to collect all the shards, and wearing goggles and washing up gloves to protect your eyes and hands.

2

  1. I used a pair of side cutters to remove the initial pin.
  2. Then using some pliers I gradually started to break the black glass. This is quite thick glass, and make sure you hold the metal top of the light bulb not the glass dome as it’s easy to accidentally squeeze too hard and to break the dome glass.
  3. Next up you need to remove the glass that holds the filament in place. This again is quite thick. I used a screwdriver placing it on the thick glass and gently taping the end with a hammer. You have to be gentle but firm but watch out that when you free the filament, it doesn’t fall too quickly as it can smash the dome below! Remove enough of the glass so you have a smooth edge inside.
  4. Then finally using your pliers gently remove the remaining filament and then you have your empty light bulb.

4

As you can see it’s a little messy!

1

I found these lush napkin holders in the Zara home sale for £6. I was searching in charity shops for them but I found they were actually more expensive as they were being labelled ‘vintage’. Anyways, place the light bulb on top of the napkin ring and decide on the angle at which you’d like your vase to be. Once happy, hold them upside down, and secure the ring in place using a glue gun.

6

And there you have it! A lovely little home accessory made from one of your old light bulbs!

78

All my love,

God Bless,

Mims

xXx

A Little Potty Experiment

Happy Friday everyone!

I don’t know about you but sometimes I’ll see something on Pinterest, have a go and It will turn out disastrously! Well I once saw some pictures of pots that had been decorated using nail varnish in water. And due to my previous Pinterest experimenting I naturally thought there is no way something so simple could create something that looks that good! But I was having a mooch in some charity shops recently (one of my favourite end of the month activities when you have no money), and found 2 plain white plant pots for 50p each.  I ended up with a spare 30mins and I finally got round to giving it a go! I must say I‘m very impressed with the results! Even if it was a bit messy!

10

All you will need are some old pots/mugs or anything you want to decorate, some old nail varnish, nail varnish remover, thin sticky backed cork, and a bowl you don’t mind getting dirty/ruined!!

11

Once you’ve filled the bowl with water, start drizzling in your chosen nail varnishes. Try to cover the outer aspects of the water too as these are the areas that will end up in the visible surface of your pot.

1

Once you’re happy with your varnish, dip the pot in the water as far as you’d like. Once removed, turn the pots upside down to allow the excess water to dry off.

2

Now this is the messy part! Only nail varnish remover will remove the varnish but it will only remove some of it in that quantity! I was trying to remove all the varnish from the bowl hence my hands stayed like this for while!!

6

My advice would be to use a bowl that you don’t mind either keeping as scrap or to recycle it.

12

I love looking at all the pretty shapes and colours the varnish made. I also learnt the hard way that even when the pots are dry, due to the bases also being covered in varnish, they can still be slightly tacky even when dry! So I found some sticky backed cork that I had lying around and used it to stick to the bottom of the pots so that they don’t stick to any surfaces you put them on!!7

13

They make perfect house plant decorations or gifts for friends!

14

15

All my love,

God Bless,

Mims

xXx


Mental Health Awareness Week

So this week is mental health awareness week. It’s a week that focuses on hope, sharing, breaking stigmas and raising awareness. 1 in 4 people per year in the UK alone are diagnosed with a mental health disorder (Mind, 2013). And yet mental health is still sadly widely considered a bit of a taboo subject, something people choose to not talk about and hideaway for many reasons. So in light of this, for this week’s blog I thought I’d try something a little different and share a story very close to my heart.
2

It all started around 8 years ago when I was visiting home from uni. I went to steal a glue stick out of my sister’s desk draw. As I picked it up, a notebook fell open and I couldn’t stop my eyes from scanning the open page. The page was filled with hate filled words of absolute loath and disgust, how she didn’t deserve to eat, how she’d vomit to punish herself. This was all written by my beautiful baby sister about herself. I sat on the floor and cried. I cried for her suffering, for not picking up on it, for not being there for her, for her not feeling like she could talk to me about it, for not being able to un-read what I saw. Right there and then I knew what it felt like to feel my heart break. The day after, I went back to uni and was there for a month – keeping this information to myself and not knowing what to do. When I came home again, I finally plucked up the courage to talk to her. I was so scared she would hate me for reading her diary, for snooping, that she wouldn’t let me in. But when I told her that I knew, she just cried and hugged me. She said she was so relieved she finally had someone to share this burden with.

For the next 2-3 years we struggled on. I knew that if I mentioned anything to anyone it would ruin our relationship and she would no longer trust me. She would ring me most days and tell me in detail what – if anything – she had eaten, how much exercise she had done and if she had been sick. For a while I naively thought she was starting to get better, but then in the spring/ early summer 2012 it all started to change. She stopped calling me as often and would no longer tell me what she was eating, her behaviour changed, became more angry, manipulative even malicious at times. I knew that this was her illness and not her, and I could feel her spiralling out of control and day by day as she became more unwell. Our parents started to suspect something was going on and her weight started to plummet. She was barely eating, dog walking for 3-4 hours a day for work, and then spending 2-3 hours in the gym in the evening. If I suggest that she was pushing herself too hard, that she needed to get help it was because I had to love her as I was her sister.

1

I remember praying to God to find a way to get through to her, because I knew that I was losing my sister, not just emotionally, her body was literally starting to shut down. To edit a long story short, that summer she joined a triathlon club and met a guy and they started dating. After many family rows, and her realising that someone who didn’t ‘have’ to care for her but did anyway, she finally began to see that she needed to get help.

She finally plucked up the courage to go to the GP and ask for help. However when she had her appointment she was told by the Doctor that “Boys don’t like skinny girls” so she should eat more. And that was that. At the time I was furious!! Now with hindsight it no longer makes my blood boil, but I was disappointed that this was so obviously a cry for help, and yet she was met with a stigma and prejudice from a senior health care professional. I now however realise we are all merely human. Fortunately she agreed to go back to a different GP if I went with her and didn’t use that previous consultation as confirmation and encouragement that there was nothing wrong with her! We went and saw an amazing doctor who recognised the severity of the situation straight away and referred my sister to a dietitian. Again to cut a long story short, she found a place for her at an eating disorder clinic as an out-patient, meaning that although clinically she qualified to be admitted as an inpatient, her GP took a risk in keeping her at home as she felt it was the right thing for my sister. Here she was diagnosed with anorexia with bulimic tendencies and at her lowest weighed 5 stone 8. Her GP having the foresight to keep my sister at home paid off incredibly well. Within weeks she was slowly starting to put weight on and within months she started to come back to life. I’ll never forget the day when I realised that I had my sister back, her smile was reaching her eyes again and her laugh was infectious and alive. You’d never have guessed that a few months earlier we nearly lost her. She is now a strong, healthy and passionate young woman, who will always have a daily battle with her mental health but now the difference is that SHE is in control. I have had the honour of running alongside her in mud runs over the last few years and I couldn’t be prouder of her success in her home and work life and in the physical strength she now has.

3

We were extremely blessed that she responded so well to cognitive behaviour therapy, and as a nurse I am all too aware of how this isn’t a story for a lot of people. For many this struggle continues for a very long time. But I wanted to share a story of hope with you today. And that’s what this journey has taught us; never give up, God answers our prayers (not always on our timescales) and there is always hope even in the darkest times.Untitled

Information:

http://www.mind.org.uk/information-support/

https://www.b-eat.co.uk/about-eating-disorders

Instant help:

http://www.samaritans.org/how-we-can-help-you/contact-us

https://www.b-eat.co.uk/support-services/helpline

Affordable Counselling:

http://www.emmauscounselling.org.uk/index.php

All my love,

God Bless,

Mims

xXx