Who Loves Scrabble?

Happy happy Friday!

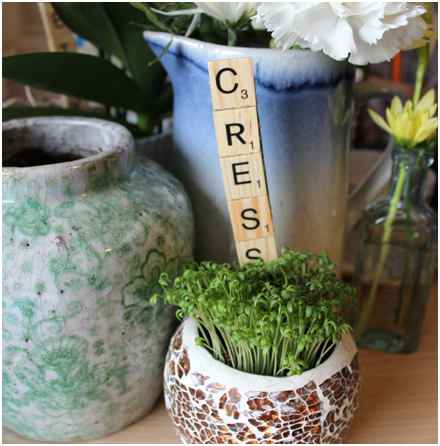
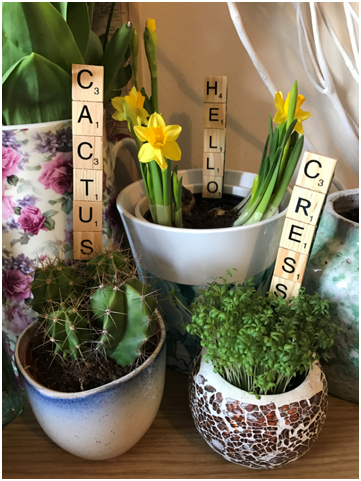
In case you hadn’t noticed yet, I’m a lover of all things floral. Flowers are a lovely way to brighten up my home all year round. My sister has recently moved into a flat with a little garden out the back. It was very plain, a small garden with a lawn of grass. Well I say grass, mainly moss actually! But she has become a right little gardener .She loves it! Tiger have had a section devoted to gardening recently, so I brought her some gardening bits including some seeds and plain wooden plant markers so she wouldn’t forget what she’d planted where. I remember thinking they looked a bit boring! I was then sat looking at my craft scrabble letters and had a little light bulb moment and came up with these lovely little scrabble letter plant signs!

3

I had a rummage in my parents study and found these old craft lolly sticks. I then painted them green with some chalk paint.

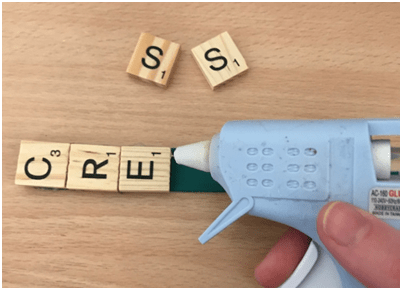
Having already selected some words to create, I began sticking the scrabble letters to the sticks using my glue gun, making sure that I glued the side of the letters too.

7

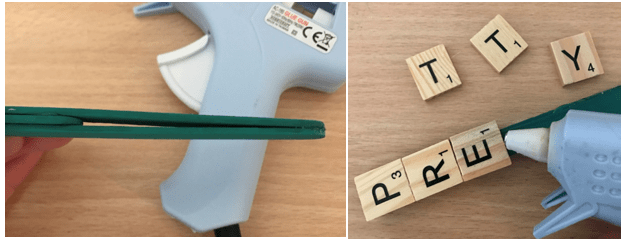
For slightly longer words, I stuck 3 regular lolly sticks (painted) together as shown below.

8

I then glued the ends and pinched them together, before again sticking the scrabble letters down.

9

Then all that’s left to do is get labelling!! Such a cute little project!

1

3

2

4


All my love,

God Bless,

Mims

xXx


May Day Celebrations

Happy Friday everyone! This evening sparks the start of a lovely bank holiday weekend, and what better way to celebrate the May Day bank holiday than with a lovely little garden party. Today’s post is all about this lush homemade bunting! It’s super quick and easy to make, and turns your garden into something special to impress all your guests.

1

2

To make the bunting you’ll need around 2 hours, maybe longer/less depending on how much you make. First up you’ll need some lovely coloured fabrics, a sewing machine, thread, fabric scissors, pins and some pre-folded bunting tape (you can pick this up in varying thicknesses in most sewing shops and online).

3

I then got a piece of cardboard and cut it to the size I wanted my bunting triangles to be. I then drew two triangles side by side before cutting them out.

I then pinned and sewed the triangles before turning them the right way round.

7

Next get your bunting tape and approximately every 30cm sew in a triangle (vary this length depending on how much space you would like between each piece). Make sure to leave around 30cms at each end of the bunting so that you have enough to tie it onto something in order to hang it up.

8

9

10

11

Then all that’s left is to invite all your friends to come celebrate with you! I hope you have a lovely bank holiday!12

All my love,

God Bless,

Mims

xXx

13

A Little Upcycling Cushion Project

Storage solutions are everywhere these days. If you have a little Google a whole host of helpful and handy ideas and resolutions are readily available and very useful. However there is something rather lovely about the simplicity of using pretty boxes to store things in. They are not only exceptionally pretty they but they can also be a cheaper and fun option.


I use one of my many lovely boxes for all the little scraps of material that get left behind. I can’t quite bring myself to waste them and throw them away. I’m a bit geeky as I love looking through the box as it reminds me of some of the little projects I’ve done over the years.

1

Every now and then the lid becomes a little of a snug fit and the scraps are overflowing! So what better way to solve the problem than to make a lovely scrap cushion! Kinda kills two birds with one stone, using up my scraps of material without them going to waste and I get a lush new cushion too!

Firstly, I have a rummage and find some scraps that sort of match and gradually match up different sizes, sewing them together as I go.

2

I love it as it’s a gradual process; you never quite know how it’s going to turn out. Initially I don’t worry too much about the size of the final piece, It’s more about gradually fitting pieces of material together, kinda like a puzzle with no correct answer.

3

Once all the pieces are sewn together, I then used the cushion inner as a basis for the size of the cushion. For the back of the cushion I measured 2 pieces of material that were ¾ of the width of the cushion inner and the same height.

4

I folded approx. 1cm of the edge of the material over twice and sewed down this to make a neat edge to the opening of the back of the cushion.

5

I then sewed the edges together, before turning the cushion cover the right way round, cut across the corners, so that you get a nice point to the corners when they are turned round the right way.

6

And there you have it! A lovely little afternoon project!

All my love,

God Bless,

Mims

xXx

Happy Easter

Over the last couple of weeks we have been truly blessed with the most beautiful weather. Just in time for making Easter feel that much more special with spring really displaying it’s best qualities.

Here’s a little collage of photos from a recent trip to Covent Garden. I’m literally in love with their Easter decorations!

Edited

All those colours just make you feel so happy don’t they!

Here’s another little collage from a lovely walk in Hampshire.

Edited2

This week I have been on nights and feel like I’ve been missing out on some rays. But before I started work I created my Easter display and my room has been filled with the scent of hyacinths and daffodils ever since. This week’s Easter make are these lovely little hanging Easter eggs.

ed13

First of all you’ll need some ribbon, some plastic white eggs, a glue gun, PVA/Pritt stick glue, and other decorative media of your choice. I used paints, glitter and washi tape to create mine.

ed7

For the glitter eggs, I coated the eggs in Pritt stick (so disorganised that I ran out of PVA!), then poured glitter over the eggs and let them dry thoroughly.

ed8

For the painted eggs, I painted one half and let them dry so as to not get my prints all over the eggs. To dry them I placed the eggs on top of old drinks bottles. Once dry I then painted the other half and repeated the process of drying.

ed3

ed9

The washi tape eggs were slightly trickier in that the eggs are obviously round and the tape is not! So I found using narrower tapes and placing them towards the centre of the egg were more effective.

ed5

In order to be able to hang the eggs up, I used little strips of ribbon, and made a loop sticking them down to the top of the eggs with my glue gun.

4

Then all that’s left is to arrange them and admire all that happy Spring-ness!!

ed10

Hope you have a very Happy Easter!

All my love,

God Bless,

Mims

xXx

Matthew 28: 1-10ed11

The World According to Washi

So as you may have guessed by now, I’m all about the Washi tape! Literally cannot get enough of the stuff!

Fav Tapes

Not sure exactly why I’m quite so obsessed, maybe because of all the pretty colours and textures, the glitter, the patterns, the different sizes and its versatility. But as my stash of tape has expanded, I realised I needed to come up with a cute storage solution too.

Edited

I have often seen these cute wooden box storage units in photos and have always longed after one but haven’t quite been able to justify the need. So my expanding Washi tape collection was the perfect excuse to purchase one.

Box

I got the box off of eBay. You can buy them already looking pretty too but naturally I wanted to have a little play. There are so many fun and funky ways to decorate them (decoupage, ribbon, pretty papers, glitter) but I thought I’d use the Washi tape it was going to contain as inspiration.

Elephant Love

Equipment needed:

Plain storage box

Washi tapes

Sticky backed fabric paper

Glue


Firstly I selected some of my favourite washi tapes and sticky backed fabric papers (I got these from Tiger – so cute).

Fabric Paper

I then started working on a decorative design for the box, arranging the paper and tapes in a pattern. I used the end of the drawers to use as a stencil to draw around on the sticky backed paper. Once this was cut out, (I used fabric scissors as the fabric tends to fray using regular paper ones) I then carefully stuck the fabric paper over the end of the drawer. Then moving on to the washi tape drawers, I started at the bottom firmly sticking the tape down in rows. I used a pencil to mark on the back of the tape where the opening holes would go to get an accurate finish.

Then all that’s left to do is fill the drawers with all your favourite things!IMG_6662

All my love,

God Bless,

Mims

xXx


Blue Washi

Door Knobs

Pretty Little Flowers

So this weekend I aged a year and have had a lovely time celebrating with my family and friends. And although I’m a little sensitive and not ageing particularly gracefully, I have enjoyed all the birthday lunches and dinners (even if my scales are now crying a little). Accessories are always important for making an outfit that little bit more special, and these flower barrettes will not only make your outfit, but will also be a great talking point. Especially when you can say you made them yourself. Check out the tutorial below and let me know how you get on!

All you will need are some buttons, a pretty piece of material, needle and thread, plain hair clips or broach pins and a glue gun or strong fabric glue.

D

3

Firstly pick out some cute material to match your outfit for the day, then draw around a circular object, I used a plate, and then cut it out.

Using a simple running stitch sew around the outside of the circular piece of material.

Once you have sewn around the edge of the circle, pull on the thread gathering the edges together.

Once together use the same thread to sew the hole in the middle together nice and tightly.

IMG_9417

Then sew a matching button over the gathered edges/hole in the centre. Make sure the gathering is central before you sew the button in place.

Once the button is secure, turn the barrette over and using a glue gun to secure a hair clip or broach clip in place.

2

Then all that’s left to do is meet up with some lovely friends and have some lush lunch!

All my love,1

God Bless,

Mims

xXx


All the Mother Hens

Heart Cushion

Happy Friday! As most of you will have remembered, it is Mother’s Day on Sunday. However there will be a few of you that think ‘oh pants I totally forgot!’ Well do not worry because I have come up with a little simple but super cute homemade heart shaped cushion gift idea. I don’t know about you, but my sister and I are blessed to have an amazing mother hen, and there is no better way to shown how much they mean to you than using your time to create something handmade for them.

So what will you need to make this lovely little gift? Well it’s actually pretty simple! You’ll need some pretty fabric, wool, stuffing, fabric scissors, cardboard and a needle and thread/sewing machine.

1

First up make a stencil from your glamorous cardboard, and using the dull side of the material, draw around and cut out 2 heart shapes. Then place the cut out hearts, good sides facing each other and pin them together.


Then sew the edges together making sure you leave around a 2 inch gap in order to turn the cover inside out once all sewn. I used a back stitch to do this, as shown in the pics below, make the stitches as close together as possible for a tighter finish. Alternatively using a sewing machine does this for you.

4

5

Next turn the cover inside out and start stuffing the cushion, making sure you stuff right into the edges and point of the heart.

6

Then stitch the gap up make sure to appose the edges so they don’t fray.

8

To finish off, use a blanket stitch (shown below) with the wool around the edge of the cushion. This will finish it off and hide any potentially untidy edges! I like to use a nice long piece of wool to start off with to make sure I can make it the whole way round in one go, however watch out for woolly tangles and knots!!

9

10

And there you have it. A beautifully simple, quick, cute Mother’s Day prezzie.

Happy Mother’s Day to all you lovely mothers out there!

11

Hope you have a lush week,

All my love,

God Bless,

Mims

xXx


13

12

Hello Spring

Wooden Crate Tutorial:

Good morning! I hope you’ve all had a lovely week.

I have been loving all the pretty little flowers that have been surfacing recently. Especially the crocuses. For me, crocuses represent the coming of spring and all things sunny and fresh and warm. It also awakens that old cliché of needing to dust off your home and have a good old spring clean.

Flowers

I live in a pretty small space, and as I’m sure will be familiar to most of you, it doesn’t take long for my newly tidied space to become pretty messy all over again! However I am currently on a little mission to try and de-clutter and re-organise, one little bit at a time.

Today’s mission was to try and create some more space and reorganise my chest of drawers/bedside table. My plan for this very simply involved a wooden crate, pretty paper, a ruler/pen, scissors, some glue and a little bit of hope that the plan would work! Wooden crates can be a very simple, easy and adaptable storage solution. So here’s how I got on!

This was how my chest of drawers started out… A little Cluttered…Trust me this is it on a good day!

Just on a sneaky side note, how lush are these door knobs?!

Untitled

Anyway back to it! I purchased this blank crate in Hobbycraft for £8 which I thought was a bit of a bargain. I love the washed wood look for the sides but the bottom looked a little scruffy and bland.

So I got to thinking of how to pretty-fy it. I selected some lush paper and drew round the base of the box as an easy sizing starting point.

I then measured the widths of the sides of the crate and used a ruler to accurately map the base of the crate on the paper. To make sure the corners are accurate I measured the corner piece as shown below and transferred it onto the paper.

5

I then repeated this process for both sides of the corner piece, before cutting out the measured lines.

6

7

Once cut out, I used some Pritt stick to secure the perfectly fitting paper in place. One bland looking crate turned into a very pretty one! And all in about 10 minutes!

8

The perfect little afternoon project and an ideal little excuse for a craft sesh when you should be doing more tidying up!! My challenge now is to not fill the space I’ve created with random other stuff!!11

All my love,

God Bless,

Mims

xXx

10

And so it begins…

Missing that Christmas Feeling

So I don’t know about you but I have a little case of the post Christmas buzz blues! The cosy decs are all down and although everywhere looks spacious and tidy, it is also at risk of becoming a little empty. Subsequently this week I decided to bring back that Christmassy giving feeling and make some potential cute little gifts. In fact I made and gave some of these gorgeous earring holders to the girls for Christmas. Hope you like the tutorial below!

Homemade Earring Hanger

Equipment needed:1

Box frame

Pretty Paper/Card

Lace

Glue gun

Pencil

Ruler

Time: 20-30 mins

First up is selecting some lush paper/card for the back picture for your earring holder. Now I fell in love with these gorgeous papers from Louise Tiler’s Paper Flowers collection and just had to use them! They’re so pretty!

2

So once the paper has been selected, undo the back of the box frame. Turn your chosen piece of backing paper over and use the back of the box frame to draw around in order to get the exact size. Once done, slot this into the box frame, replacing the back piece once done. Then select coloured lace to match the backing paper. When cutting the lace, make sure you have enough to wrap around the back of the frame on each side.

3

Arrange the lace over the box frame until you’re happy with the position then measure and write down the distances between each lace. Turn the frame over and in pencil mark along the edge the previously measured intervals.

4

Place the first lace ribbon under the frame leaving an equal amount each side. Then, using your glue gun, start to glue the first piece of lace in place using your pencil markings as a guide. Once one side is complete, pull the lace ribbon taught before gluing down the opposite side.5

6

Once compete I put a little glue over the end of the lace ribbons to limit fraying.

7

Such a cute, simple, homemade gift, or just a little something to keep for yourself!! Hope you enjoy trying this out, I’d love to hear your thoughts,  comments and progress below.

All my love,8

God Bless,

Mims

xXx

9

img_8448